

A couple months back, I wrote an article about the 3 simple exercises that transformed my handstand.
With over 44,000 views and 550+ shares on Facebook, I decided to contribute a sequel article. In this article you will learn three more exercises to practice that will get you closer to a strong handstand.
I’m going to demonstrate a quick way to warm up your wrists, open your shoulders and build more pushing strength that directly translates into a better handstand. These are some of the most beneficial movements I’ve used in my own handstand practice and have seen work in others.
Wrist Warm up
As I discuss in my free five-day handstand mini-course, it’s important to spend at least five minutes warming up your wrists before hand balancing. It doesn’t have to be complicated, as you will find out in the video below. However, it’s necessary to progressively load the wrists, making sure they have time to warm up and adjust to the stress being placed on them.
Warming up the wrists can be done by getting on all fours, making sure that the fingers are spread and the index fingers are pointed forward. In this position, It’s crucial to spin the pit of the elbow forward (externally rotate) and lean forward with locked elbows, pouring the weight into the first knuckles. Move forward and backward into that end range of motion. After a minute or two of this, start making some circles while keeping the weight over the hands and knuckles.
Practice for five minutes before hand balancing.
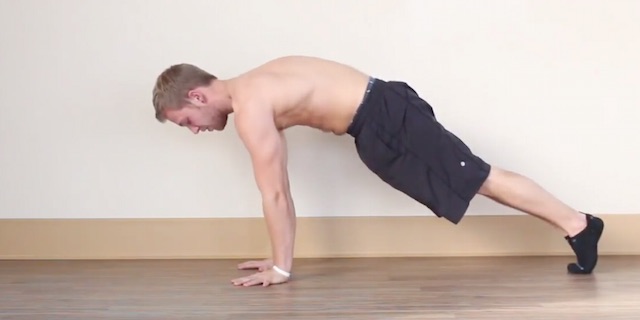
Scapular Push up
The scapular push up is a great movement for building pushing strength that translates into a strong handstand position. When you are in a handstand, it’s crucial to be pushing into the floor as hard as you can and this takes a lot of straight arm scapular strength that is not usually very developed for most people.
In the video you will notice that I’m in push up position, squeezing my butt, tucking my pelvis, and turning the pits of my elbow’s forward (externally rotating). While maintaining this tight position, I protract and retract my shoulders. Notice how my spine does not move and my arms remain locked out the entire time with my weight over my hands.
Practice for three sets of 10-15 reps each.
Open shoulder position
This movement is a bit more advanced, but I think it’s a great way to open the shoulders and understand what that feels like. There are many variations to this movement used to open the shoulders, but I’ve found this one to be the best for me personally. In order to avoid the dreaded “banana handstand”, it’s important to understand how to open the shoulders in the position. Moving through this range of motion will help you understand how to do that in a freestanding handstand.
As demonstrated in the video, I kick up to a handstand facing away from the wall, making sure that I place my hands about two feet away from the wall. While arching my back and keeping both feet on the wall, I slowly tuck my legs, sliding my feet down. In this position it’s important to focus on arching your back and pushing your chest forward. Finally, I push into this end range of motion. Once a person is in this end range of motion, they could hold the position for 20 seconds and come out of the handstand controlled.
Practice for three quality sets of 20 seconds each.
Handstands are one of my favorite things to practice and teach, but I know what it’s like trying to learn them. Sometimes it can seem like you are not improving, and sometimes you need to adjust the smallest thing before it works.
That’s why I put together this mini-course. In fact, I’ve put it together specifically for this audience because you guys are so great!
~
Author: Ross Johnson
Editor: Caroline Beaton
Image: YouTube still


Read 0 comments and reply