
Stretch marks…ugh!
Pregnancy is the biggest culprit, but growth spurts and weight gain can also attribute to these shiny marks of change. Some say that they are inevitable and unpreventable, due to genetics and skin make-up. But during my pregnancy, I wasn’t willing to just sit back and take the chance. Plus, I was pregnant in the Canadian prairies (blizzards, snow, dry, bitterly cold) and I didn’t want to deal with extra itchy skin as my belly grew and the skin tightened.
I stumbled upon The Healthy Honeys blog and found this recipe during my first trimester of pregnancy. I dawdled at preparing it as I was researching essential oils at the time and trying to stay awake for more than four hours, thanks to baby’s demands. I was extremely nauseous throughout my entire pregnancy and when I smelled the oils that the recipe called for, it triggered my nausea. I finally gave up on the essential oil ingredients and went ahead with my own version.
Essential oils have many benefits, but leaving them out made this cream much more versatile for my uses during and after pregnancy, such as:
Massage cream (if I ever succeed at convincing my husband to give me one)
On baby’s dry skin
For diaper rash
To heal cracked nipples
Lip balm
On dry heels
To heal cuts
Even to speed up blemish recovery
I discovered all these extra uses while pregnant, because I was fearful of putting processed chemicals on my skin. I was worried about the risk to baby. Now, I can confidently use the cream on my baby without having to research which ingredients are safe for both of us. Not all essential oils are safe for pregnancy or infants. Keeping essential oils out of the recipe was beneficial for me and my uses.
Not only did I use the cream to keep my skin elastic and soft, but I found it was therapeutic as I applied it. It’s quite a thick cream so warming it up in my hands and applying it took some extra time and care. I found that I looked forward to this time, using it as an excuse to spend time with my growing belly.
This seemed to increase my bonding with baby. After every shower I would spend a good ten minutes massaging the cream into my belly, breasts and thighs and basking in the beauty of my changing body. I would also spend another ten minutes letting the cream soak in, as it’s quite greasy. I loved catching glimpses of my big belly in the mirror as I waddled around the bedroom.
Near the end of the dry winter, I found myself using the cream all over my body and not just for my belly. It helped keep my skin soft and supple. I will continue to use the cream every winter moving forward.
I didn’t mind the smell of the cream without the additional scents of the essential oils. It definitely gives off a subtle honey-like smell with a hint of coconut. If you have the essential oils listed as optional, feel free to add them or any other favorite oils you would like. The options are endless if you want to create a certain scent.
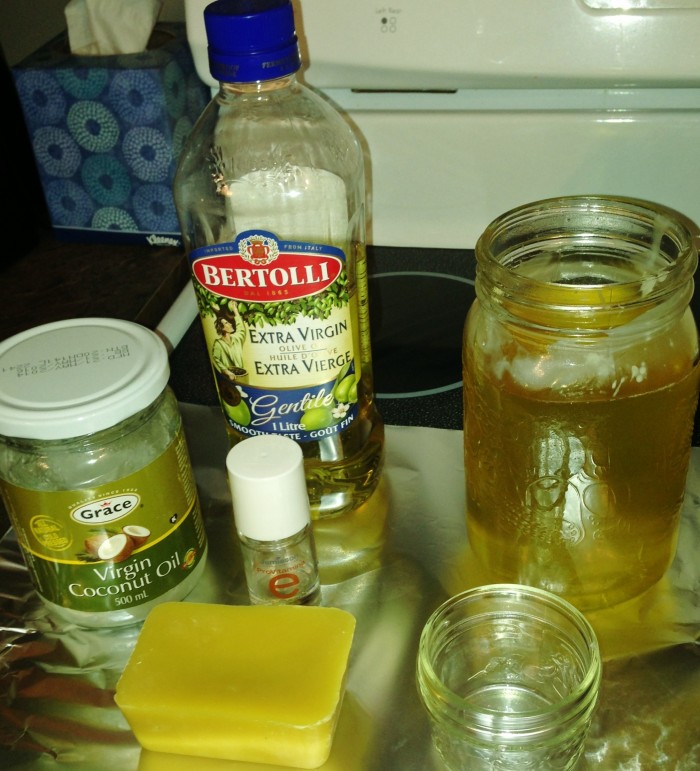
I recommend getting the highest quality ingredients that you can as it will make the cream smoother and better quality. Here’s a little bit more about the ingredients and why they’re beneficial in a skin cream:
Olive oil—rich in Vitamin E and antioxidants. Try to find high quality organic, extra virgin oil for topical use.
Coconut oil—it’s important to find organic, virgin, cold pressed coconut oil as the quality shows in the consistency of the cream. My first time making the cream, I used a lower quality coconut oil and dealt with annoying clumps during application.
Beeswax—very healing, moisturizing and softening for the skin. Helps heal damaged skin and acts as an absorbent for all the good oils. I was lucky enough to find a bee farm close to home that sells beeswax in 150g blocks (227g of beeswax equals 1 cup). If you know of someone that makes candles, they should know where to find high quality beeswax.
Vitamin E oil—great for skin’s elasticity. Most pharmacies carry pure Vitamin E oil in capsule or serum form.
So, here’s the recipe for your DIY Stretch Mark Cream:
Base Ingredients:
1 Cup Olive Oil
½ Cup Coconut Oil (Organic, Virgin, Cold Pressed)
½ Cup (approx 113g) Beeswax
1-2 Tbsp (8 capsules) Vitamin E Oil
Optional Ingredients:
8 drops Frankincense oil
8-10 Drops Gentle Baby Blend (or 4 drops each of lemon and lavender essential oil)
8 drops Myrrh
2 Tbs. Rosehip seed oil
Instructions:
Place beeswax in a mason jar and place the entire jar in a pot of boiling water. Let the beeswax melt first. (If you have a block of beeswax, it will help to cut it up first.)
Once it’s beginning to melt, place all other ingredients in the jar and wait for everything to melt together.
Remove from heat and place in heat safe containers. (If you don’t want multiple containers for your cream, you can also leave it in the mason jar.) Stir occasionally until cooled.
Apply after every shower and when skin feels tight and itchy.
Finally, here’s some additional notes that you may find helpful:
Don’t get water in the jar when heating!
A double broiler would work as well.
The cream is thick and quite greasy, so give it some time to dry before putting clothes on. Air that baby belly!
I like to place some of the oil in smaller containers for travel or for gifts for expecting mothers. I hope you enjoy the cream as much as I have. Happy rubbing!
Relephant:
44 Genius Benefits of Coconut Oil
Author: Jaimee Guenther
Assistant Editor: Hilda Carroll / Editor: Catherine Monkman
Photo: Author’s own

Read 1 comment and reply